Yoga is a journey inward — a way to reconnect with your strength, flexibility, and peace. Among the many beautiful poses that help facilitate this connection is the Temple Pose. Known for its grounding energy and ability to open the hips, this pose is an essential part of many yoga sequences, especially in practices like Vinyasa, Hatha, and Yin yoga.
In this blog, we’ll explore everything you need to know about Temple Pose, from its benefits to how to practice it safely and effectively.
What Is Temple Pose?
Temple Pose, often referred to as Goddess Pose or Utkata Konasana in Sanskrit, is a wide-legged squat that energizes the body and opens the heart and hips. It is named “Temple” because the wide, powerful stance mirrors the strong, rooted pillars of a temple — steady, sacred, and balanced.
Although it looks simple, Temple Pose challenges your balance, strengthens your lower body, and requires mindfulness to maintain alignment.
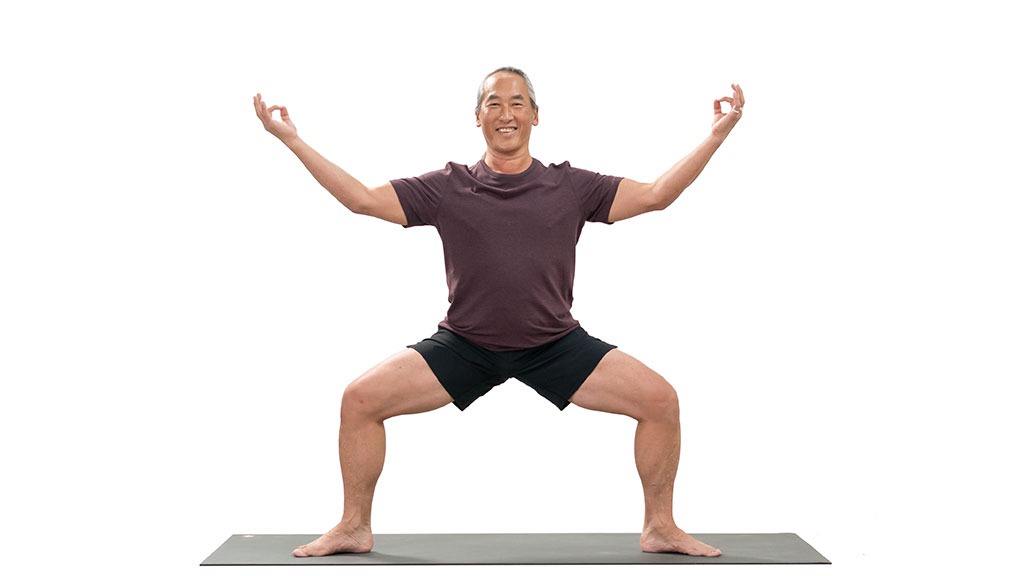
How to Practice Temple Pose
Here’s a step-by-step guide to practicing Temple Pose correctly:
- Start in Mountain Pose (Tadasana), standing tall at the top of your mat.
- Step your feet wide apart, about 3-4 feet distance.
- Turn your toes out at about a 45-degree angle.
- Bend your knees deeply, ensuring they align over your ankles.
- Sink your hips down, as if you’re sliding down an invisible wall behind you.
- Bring your arms up, elbows bent at 90 degrees, palms facing forward in a cactus shape.
- Engage your core, lengthen your spine, and lift your chest.
- Hold for 5-10 breaths, feeling the strength and openness in your body.
- Release by straightening your legs and stepping your feet back together.
Tips:
- Avoid letting your knees collapse inward.
- Keep your shoulders relaxed and away from your ears.
- Focus on rooting down through all four corners of your feet.
Benefits of Temple Pose
Practicing Temple Pose regularly offers a range of benefits for both the body and mind:
- Strengthens lower body: Tones thighs, calves, glutes, and ankles.
- Opens hips and chest: Improves mobility and posture.
- Enhances balance: Develops stability and proprioception.
- Boosts energy: Awakens the body and sharpens mental focus.
- Empowers mindfulness: Encourages inner strength and presence.
Temple Pose is also particularly empowering for women, connecting them to the energy of strength, creation, and resilience.
Common Mistakes to Avoid
Even though Temple Pose seems accessible, there are common misalignments to watch out for:
- Knees falling inward: This can strain the joints; always track your knees over your toes.
- Leaning forward: Keep your torso upright rather than tipping forward.
- Collapsed arches: Keep the feet active, pressing down evenly to support the ankles and knees.
Correcting these small details ensures you enjoy the full benefits without risking injury.
Modifications and Variations
Whether you are a beginner or an advanced yogi, Temple Pose can be modified:
- Use a wall: Stand with your back against a wall to help support your posture.
- Place a block: Sit lightly on a yoga block for added support if your hips are tight.
- Arm variations: Instead of cactus arms, bring your hands to prayer position (Anjali Mudra) at your chest for a gentler variation.
You can also flow dynamically by pulsing slightly up and down, or moving your arms like wings, to add a creative touch to your practice.
Conclusion
Temple Pose is much more than a physical stance — it’s a reminder of your own inner strength and grace. When you step into Temple Pose, you are standing firmly in your own sacred space, empowering your body, mind, and spirit. Whether you’re looking to build strength, deepen your balance, or simply reconnect with yourself, Temple Pose is a beautiful practice to incorporate into your yoga journey.
With consistent practice, you’ll not only notice physical benefits but also a profound sense of grounding and empowerment that extends far beyond the mat.
FAQs About Temple Pose
Q1: Is Temple Pose suitable for beginners?
Yes! Temple Pose is accessible to most beginners, especially with modifications like using a block or the wall for support.
Q2: How long should I hold Temple Pose?
Start by holding for 5–8 deep breaths, and gradually increase the time as your strength and endurance improve.
Q3: What should I do if my hips are tight?
Use props like yoga blocks, don’t sink too low, and practice hip-opening stretches regularly to increase flexibility over time.
Q4: Can Temple Pose hurt my knees?
If done incorrectly, yes. Always make sure your knees track over your toes and avoid letting them collapse inward. Engage your muscles for better support.
Q5: How can I deepen the pose?
You can deepen Temple Pose by lowering your hips closer to the ground, lifting your heels off the mat for an added challenge, or incorporating dynamic movements like gentle pulses.

